Thursday, October 27, 2011

BOO

Do you BOO?
I'm my neighborhood Boo-en is a big deal.
With so many kids in a family it's hard to make
the boo personal to each child.
Sooo, this year I did a general family boo.


Aren't these the cutest........ seriously??
I found the recipe here, smores in a jar!!!


1 pack of crushed graham crackers in the
bottom of a 1 quart Mason jar.


Then squish a package of Peeps in the jar.

Top it all of with a cup of Holiday M&M'S


Then add 1/3 cup of brown sugar.


Top off with 1/4 cup more of the candy.


All the recipient has to do is dump the jar
into a 9x8 baking pan. Cut up the ghost and
mix ingredients with 1/2 cup of melted butter
and 1/2 teaspoon of vanilla. Bake in a
350 degree oven for 15 minutes, cool completely,
slice into bars and enjoy.
I couldn't find regular M&M'S..... so, I used a
combination of peanut butter M&M'S and
chocolate chips.    Y.U.M


My favorite part is how these guys look
against the glass.  ;)

The fun part, adding special touches to the jars.


Don't forget to print out instructions and place on the back
side of the tag.


Isn't he just begging to be released from this jar.....


and turned into this.


BOO to you.

Tuesday, October 25, 2011

What's Inside a Pumpkin


Have you ever wondered what is inside a pumpkin?
I did so I cut one open, and to my surprise......


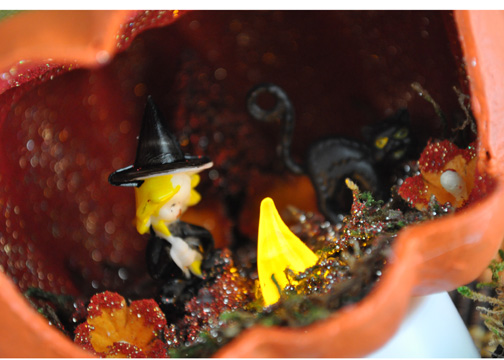
a Witch and her kitty were hiding inside!


I don't have a "proper" tutorial for this little
project but, here is a "cliff-noted" version.

With a craft knife I sliced open a little window
into a paper mache pumpkin. Painted inside and
out with orange paint. Once the paint was dry I
painted the inside with craft glue and glittered.


At this point it occurred to me that this should be illuminated.
Having those battery operated tea light around payed off. So,
I cut a hole in the bottom of the pumpkin just large enough to
slide the tip of the tea light in.


Then I glued a layer of moss in the bottom, yes and more glitter.
The moss helped hide the tea light a bit. I added a little tree in
the back and some flowers. Then I placed the Witch and kitty
in, glueing with hot glue.


To hide the tea light base I cut a piece of wood big enough
to slip the tea light into. Then drilled a hole, with a hole saw into
the wood to hide the base of the light. Then covered the wood
up with some moss, helping to block the light escaping from the
bottom of the pumpkin.


I also added a little leaf and vine curl to the top of the pumpkin.


I think these two look very happy in their little home.
So, I invited them to live on my mantel.


I love the way their cozy little fire flickers
and glows. Can't wait to see what's in my
pumpkins next year!!  ;)

This craft is linked up to Today's Creative Blog.

Thursday, October 20, 2011

Room With A Past

WOW! What a shop.
Room With a Past is a once a month
antique sale. Tonight is THE opening.....


You're sure to find lots tricks and treats....


Spooktacular.... don't ya think?


My friend Jan made this...


Check out her blog to see tips on how she
made these spooky chalkboard windows.


Speaking of windows.....


Last month was the Room's annual parking
lot sale. I scored those windows you see,
for an unbelievably low price. That little
blue bird cage flew home with me too.

Want to see more of the parking lot sale???


and inside....

 Sweet dresser......

I'm telling ya their stuff is just too good.

Now the best for last.... look at what was waiting for me out in that parking lot!!!

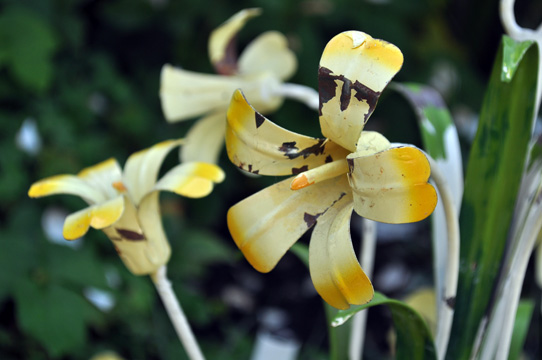
Oh! Yes!....... a lovely little chandelier..... waiting to be installed
in my bed room. A rainy day project for this winter.

Love the chippy yellow flowers...
I'll be stop-pen by the "Room" tonight... will you?


Saturday, October 15, 2011

Caramel Apple Party

It was my turn to host a neighborhood margarita night.
We had a very delicious taco bar. But, the main event
was the caramel apple bar.


Oh! So! Yummy!
I kinda cheated..... shhhhh.....
I uses several jars of Trader Joe's Fleur de Sel Caramel Sauce.
Just spooned the sauce into a fondue pot, easy.
This is a great product, not tooooo sweet!
AND good depth of flavor...... A+


Granny Smith apples, they take the longest to brown.
An hour before the party I cored about 20 apples.
Squeezed a little lemon juice in the opening. Just before serving
I cut the apples into about 8 pieces. They lasted the whole party
with minimal browning.


Let's talk toppings... oh yah.....
Mini peanut butter cups, toasted coconut,
cinnamon chips, fall sprinkles, mini milk chocolate chips,
and that last one way back there, will talk about latter.

Oh wait there's more


Regular coconut, peanut butter chips,
rainbow sprinkles, dark chocolate chips,
chocolate covered pomegranate seeds,
and toffy bits.


AND THEN....... a platter of broken oreo cookies, ginger snaps,
graham crackers, peanuts, almonds, walnuts, and pretzels.

MY fav of all time.......


Chocolate covered sunflower seeds..... yum.

MUST. DO. THIS. AGAIN.
Thanks to such a great bunch of friends and neighbors.

Tuesday, October 11, 2011

Halloween Wreath

I love holiday crafts......... love.
So, I was itching to make something spooky for the BEST
holiday ever.... after Christmas of-course.


I needed wanted a new halloween wreath.
I needed wanted one of those yarn ones that are popping up everywhere.
AND I needed wanted to make something with this stuff!
Projects with it just keep floating in and out of my mind.


Supplies

Wreath form of your choice
Scissors
Glue gun and glue sticks
Double stick tape
Divine Twine you WILL need a full roll.
And a few items from you craft stash to make your wreath special.


Start out by placing a strip of tape on the form.
Begin wrapping, tightly neatness counts. ;)


Wrapping  takes some time......... it was the longest. part. of. this. entire. project.


Now the webbing begins.
Start by tying a piece of twine around the form.


Secure each knot with a little glue to help keep them taut.
DO this right after each knot.
Now bring twine across to other side of wreathe.
Attaching with a knot and some more hot glue.


Keep doing this until you like the number of cross pieces you have created.
I varied the spacing of the twine to create a more realistic look.


Now for the spiraling pieces. Using a continues
piece of twine wrap cross pieces to create that
swirl found in a web. This is a little tricky.


When you have achieved your desired effect
tie twine and cut off excess.


Now for the really fun part.... giving my little
pet a place to call home. ;) A bouquet of glittery
black roses for my spider Hugo to hide in.


I love this project and loved working with
Divine Twine.


Look at the pattern the twine makes.....cool.


Simple and spooky.
Simply spooky.....  ;)

This craft is linked up to Today's Creative Blog.